
| The Underlands Troglodytes | Guides: painting TROGS |
|
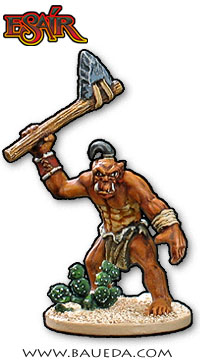
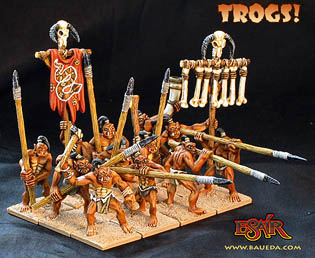
Painting Underlands TroglodytesOrcs comes in many colors, but Underland's Trogs are a distinct shade of reddish brown that is an obvious adaptation to their environment. This is not a long and detailed guide intended to help the inexperienced miniatures painter get a grasp of the basics, there are already plenty of those available! The main goal of this page is to offer a step-by-step method to paint quickly and effectively a large Trog host, so as to field a great looking army in the shortest possible time. Many people look at those beautifully painted models in hobby stores and think, "It would take me a lifetime to paint up an army like that!". That is not always necessarily true. There are way to speed things up a great deal, and while to get good results will always be a time-consuming process, by following the steps suggested here you’ll be surprised at what you can achieve in a relatively short time! Most suggestions given represent the distilled experience of literally thousands of hours of practice of quite a few people, so I hope there will be something interesting for everyone...The first and most important rule is to treat every single action as a step into a mass-production process. To mix up some color and add a few touches to a figure doesn't take much, but multiply that for a hundred figures and you'll see that even a single brush stroke more adds hours of extra work. The main trick is to work on a lot of figures at a time, my suggestion is to do batches of not less than 24 and no more than 48, given or taken a few figures. Keep them all in front of you and don't do anything on a figure that you are not prepared to repeat right away for every single other one! When you're done with the lot of them you'll still have all the time to add those all-important finishing touches where they are needed, but sort out the bulk of the work fast and well should be your first priority. |
Next, you need planning. Decide first on what you want to do, and stick to it until it's done. This guide is a good place to start, and represent a complete and consistent "plan" for painting your unit. Of course you may want to add or leave out something depending on your requirement and preferences, but if you do try to plan for it in advance. Try to resist the temptation to add an extra pass that you didn't plan; again remember: you can always add it later... But by the time you're done following the plan you'll may find that it wasn't really worth do it! The following guide does refer to colors using their usual names as they are known and referred to by any professional artist color brand; these are what you could call their "real" name and may not be the ones you are used to, as miniature manufacturers tend to invent their own names for their products. If you have doubts about exactly what color we mean by that name, just do a quick search for it's name as it's spelled here, or even better pop into your closest art supply shop and ask to look at a color chart. Any kind: watercolors, acrylics, oil colors, and any brand; they all use the same naming convention. While you're there have a look around: you may find they have high quality colors and brushes at a very convenient price. Then again maybe not, it depends a lot on where you live... In any case, keep in mind artist colors tend to be more transparent and have a much higher content of quality pigments; the tones are more luminous and intense and they give the best results for final touches. For base coats, which need to be as covering as possible, is generally better to use "miniature" paints (Vallejo are probably the best ones around). As for brushes for my money the best you can buy are still Windsor & Newton series 7, they are not cheap but they are well worth what you pay them! |
|
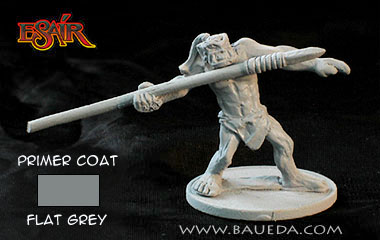
Step 1 - Assembling and primingThe first thing you need to do once you have all the figures is to clean off any eventual mold line and extra bits of unwanted metal, as it is generally found under the bases. Remember that all metal are toxic and all dust is harmful, especially if lead is involved! Use protective clothing, goggles and disposable gloves for best protection. Always carefully wash your hands before handling food and drinks. Once you're done with sandpaper and files give the figures a good scrub too, using dishwater detergent on an old toothbrush to clean all traces of mold release and dirt that may be present on the figure and prepare the bare metal surface to take glue and paint. Next assemble the figures if they have separate parts and fix the figures to a base. We suggest metal bases as they are more stable, steel washers are cheap and widely available. Even if you plan to base your figures on multiple bases it is always better use individual bases for painting, it makes it easier (and therefore faster!) to reach all round the figure. Last, spray them with a good quality primer, check that it leaves a good painting surface, a matt finish is best. There are all kind of preferences here, but we suggest priming with grey, as it works better with dark and light shades alike. |
|
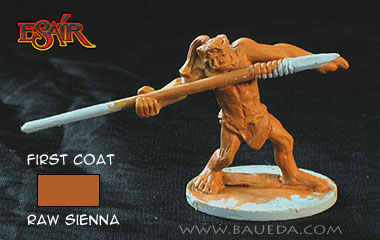
Step 2 - First coatNow let's begin with the actual painting: what you need before anything else is to set the general tone of the figure. For Trogs this is a light reddish brown that is somewhere between Raw Sienna and Burnt Sienna. You want a flat, opaque base coat over the whole figure, on all figures. To achieve this efficiently you need two things, a large cheap brush and a container with enough color for all the figures. The brush should be a number 12 or more, this means the actual head of the brush should be around 12mm wide, although different brands will vary slightly. You're best off with a synthetic brush here as these are cheaper and last longer than good quality sable brushes, which are best saved for the finest details. For the color, mix as many different paints as you need to get to a nice warm shade and make plenty of it. You can always re-use the color if you make too much, but would be very difficult (and therefore very time-wasting!) to have to try to replicate the original mix to make more. Eventually just use a small jar with a lid to save the color that is left over for the next project. The color should not be too diluted to get the best covering effect with a single pass, but obviously not so thick as to build up and obscure the details on the figure. By using a large brush and having the color on hand you should manage to do the whole bunch of figures in a few minutes. Set them aside for a while because you need the color to dry completely before moving on to the next step. Acrylic color gets touch-dry within minutes, but could take several hours to truly desicate. Usually the best is do this step in the evening, and leave them to dry overnight. |
|
Step 3 - First washThe next phase is a wash, which give depth and add realism to the colors, and also underline the details. Because of the reduced size of scale figures real shadows are practically unnoticeable, that's why by painting the shadow on the figure you considerably increase the impression of realism. To do a good wash you need to keep the color very runny, the consistency of water. I find artist's colors the best for this operation, they're considerably cheaper and much better quality than the so-called "inks" sold for miniatures, and they dry matt. The color I used here is Burnt Umber, but any dark reddish brown shade will work for this step. Using again a large brush liberally paint the shadow on top of the base coat. The liquid will run on the figure's uneven surface and will pool in the grooves, creating a nice quick and easy shaded effect. You can repeat the wash if you find the result is still too light, but make sure the first one it is well dry first. This step should also take only a few minutes for all the figures and again the best thing is to leave them to dry overnight before proceeding. |
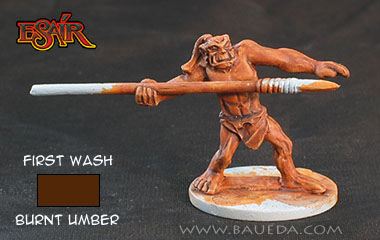
|
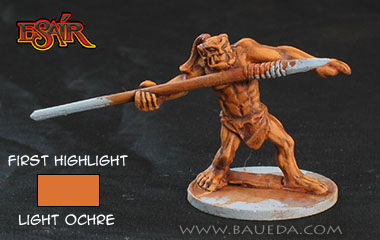
Step 4 - First highlightAt this point your figures are ready for the first highlight, this step is basically the opposite of what you have done with the dark wash. You need to bring up the raised details on the model by painting them a lighter tone of the base coat. The color for this step should again have a nice consistency to get the best covering effect with a single pass, adding a little white paint to the color also helps. Start with a Yellow Ochre and mix in a bit of the Raw Sienna you have used for the base coat, and some white. Make sure the final tone is noticeably lighter than the base coat and with a fine brush paint little daubs of color on the raised or more central parts of the figure, leaving the darker tone underneath near all the edges. This step will take a bit longer, but a few tips will help to speed things up: first of all, always make sure you have plenty more than enough color ready mixed before you start the actual painting. Also, try to find a moment you can work without interruption until you have done this passage on all figures, so you don't have to set all things up more than once. Anyway a jar with a lid that seals well will help to preserve the color if you need to stop halfway through. Don't do more than one highlight at this stage, remember that what is just a single dab with a brush on one figure means to double the time it takes to go through this step! You'll have plenty of time to add extra detail later if you will find it's needed, but wait until the rest of the figure is done before decide if this is the case. |
|
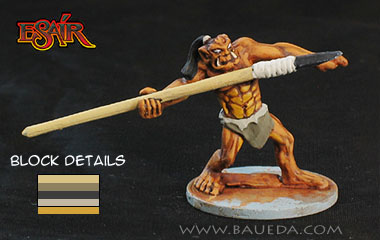
Step 5 - Base coat the detailsNow that the skin is done we need to take care of all the rest! First, identify all the colors you'll need; here we have seven. The Trog hair are done flat black. The javelin shaft is Naples Yellow with some light grey mixed in, the obsidian head is Payne's Grey, the sinew bindings, eyes, teeth and the hairband again Naples Yellow but this time mixed with white. The Trog belly, underarms and inner tight are painted Yellow Ochre, the desert rat skin is Dark Davy's gray and the same color with some Naples Yellow added in the folded out part at the top. Treat each of these as you have done in Step 2, these are all base coats, the only difference is that you now need to use a small brush of good quality and pay some more attention at what you're doing! Do one color at the time, on all figures before moving to the next one. Again each color coat should only take a few minutes, and by the time you've done the last figure the first one will be dry and ready for the next color. If you can't do them all at once at least try to finish a single color on all figures, rather than do all colors on only a few figures. It may seems like it's the same, but it's not really. By doing the same thing over and over you'll find that after the first few figures you'll get faster and faster. The operation will become automatic and will require very little concentration. Try, and you'll see you can actually do each pass in just a little less time it took you to do the last figure! By contrast, every time you change color you need to clean the brush with water, dry it, pick up some new color, etc. You also have to mentally adjust to what you are doing. All these are just little trivial details, but multiply all of them for all those figures and you're talking about hours of extra work! |
|
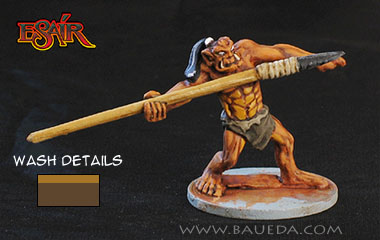
Step 6 - Wash the detailsJust as you have done with the base coat for the figure, you now need to do a dark wash to simulate shadows on all the new colors, but don't worry! First of all doing a wash is much faster, as the color will run on the figure by itself, but it goes better: you only need a couple of wash shades for all the details! The most important thing is to make sure the base coats are thoroughly dry. A good all-round color for washes is Raw Umber as shown here, but for the javelin shaft, bindings and teeth is better use a lighter color, obtained by mixing in about 50:50 Raw Sienna. The abdomen, javelin head, eyes and hairband need no dark wash. |
|
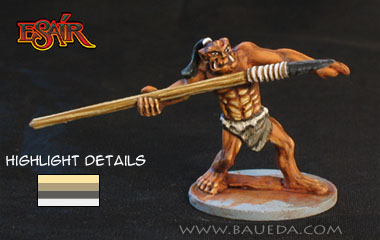
Step 7 - Highlight detailsNearly there! Now we only need to pick up a few details using a lighter shade of the base color we have applied in Step 5. The Trog hair are highlighted with Davy's gray, then eventually you can wash them again with a very dark blue-green shade to bring up the texture of the model. The javelin shaft is highlighted using Naples Yellow with some white mixed in, the obsidian head using Payne's Grey mixed with white, the sinew bindings, teeth and the hairband with pure white. The eyes need no highlight, but pupils are painted using a vertical dab of pure black. If you do the pupil too big is easy enough to shrink it with a dot of pure white on each side of the eye! The Trog belly, underarms and inner tight are highlighted with Naples Yellow, the desert rat skin with the same base color but with some White added. We have also highlighted the fingers of both hands and feet and some details of the Trog face, with Yellow Ochre and White mixed with just a little of the Raw Sienna used for the base coat. |
|
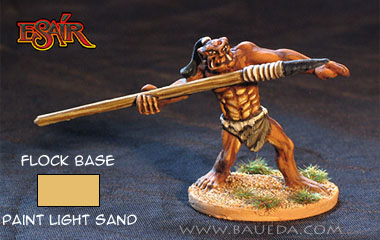
Step 8 - Paint and flock the baseWell that was it, all your figures are lovely painted, and all is left to do now is base them. Trogs live in a desert area so a rocky and arid looking terrain suits them best. The figure here has been done by covering the whole base with white glue and dipping it into fine sand. We suggest aquarium white sand, but you can use almost any type, from the most expensive specialty hobby product to the (literally) dirt cheap Dry Sand, the kind builders use to fix pavement blocks! Once the glue is perfectly dry paint it over with a light cream color, made using Naples Yellow mixed with Light Grey. The paint will also fix the sand flocking, especially if you add a drop of white glue to the color... Again let dry well then lightly drybrush with the same color mixed 50:50 with White. The final touch are a few sparse clumps of desert grasses, or even better, a small cactus! Pegasus Hobbies sell a box of plastic cactus 5/16" to 1 1/4" tall in their Museum Models range. The box is widely available from model shops, retail around five US and contains 60 cactus, most of which will fit on a base. The few larger ones come in separate parts, so you can use all the bits separately on the bases or assemble them to make a terrain marker, as you prefer!Now that you have finish your figures make sure all that work doesn't peel off the first time you use them: give them a good protective coat! There are a large number of suitable products on the market, ranging from really gloss (the toughest) to nearly matt, both in spray and paint on form. If you base your figures and you handle them by the bases usually a single matt coat is enough and looks best, my favorite is Humbrol's Matt Varnish for this, but is not available as spray as far as I'm aware. If you want extra protection you can give them a coat of spray gloss varnish and once is very well dry a couple of coats of matt will eliminate the shine. And with this we're at the end of this article, so thank you for reading this far and please do with your comments, corrections, suggestions and pictures of your Trogs! |
|
|
See also our Desert Terrain Making guide! Back to homepage |